Power Apps Custom User Image
Personalizing Power Apps is not only fun, but it can also provide users with a sense of ownership. Custom messages with user info, the ability to change themes, and the like all contribute to making your Power Apps feel like home for those in your organization.
If a user has a profile picture uploaded to their Office365 account, you can further that sense of ownership following the steps below.
Let's get started!
1. Add a Data Source
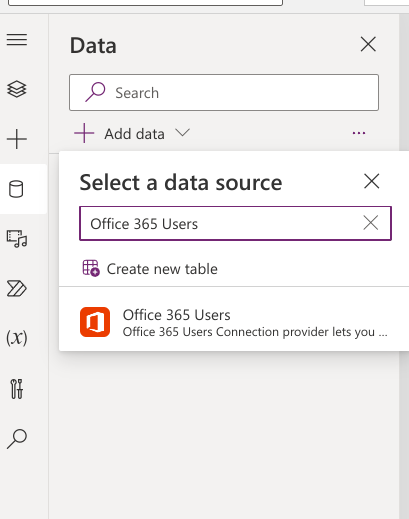
Create a new blank canvas app. Once created, add your data source from the tree view menu by clicking on the cylinder icon, then +Add Data. Search for, then choose Office 365 Users as your data source [Figure 1-1]. This will connect to all users available in your environment, enabling you to utilize info relevant to them.
2. Add an Image Control
Insert an image control from the Insert dropdown menu [Figure 2-1]. Move the image to the center of the screen and enlarge it for better detail [Figure 2-2].
[Figure 2-2] - Centered and enlarged image control on blank canvas
Now it is necessary to tell Power Apps what we want shown instead of the default sample image. In the formula bar, under Image, replace SampleImage with User().Image [Figure 2-3]. This will return the current Office365 user's profile picture (if available) [Figure 2-4].
[Figure 2-3] - Formula bar with User().Image function.
[Figure 2-4] - My handsome mug.
3. Customize the User Image
So it's already pretty cool to have a user image. Now, let's add a couple of things to make it pop a little more.
First, let's customize the border. In the properties pane, scroll to the border section. You will see the options for Color, Border, and Border Radius [Figure 3-1]. Each category has their own customization options.
[Figure 3-1] - Border properties subsection.
Now let's round out the borders to make the picture appear as circular:
1. Make sure that the dimensions of the image are equal. So if the picture is 200 px wide, you'll want to make sure the height is set to 200 px as well. This will set up the next step.
2. Set the Border Radius to the same size as your picture. Now you should have something like Figure 3-2:
So now that your profile picture is rounded, you can set a border to stylize the photo. Simply play with the Border Radius and Border attributes to get your desired look. Add in the user's contact info using custom text labels or other useful information and cool things. Feel free to tailor the rest of the possible settings to your taste or your client's needs!


Comments
Post a Comment